How to Replace Refrigerator Door Gasket – Step-by-Step Guide
Your fridge door gasket — that soft rubber seal running around the inside of the door — is one of the most important parts of your refrigerator. It keeps cold air in and warm air out. When it wears out, your fridge works overtime, your electricity bill goes up, and food spoils faster.
The good news: replacing a fridge door gasket is one of the easiest DIY repairs you can do at home. No technician needed. No special tools. Most people finish in under 45 minutes.
In this guide, we’ll walk through the complete process — from figuring out if you actually need a new gasket, to installing it and making sure it seals properly.
Safety first: Always unplug your refrigerator before working on the door. The fridge can shift when tilted, and you don’t want it falling on you.
Table of Contents
Do You Actually Need a New Gasket?
Before you order a replacement, check if the problem is really the gasket. Here’s a quick test:
The Dollar Bill Test (or any paper):
- Open the fridge door.
- Place a dollar bill or a piece of paper halfway inside the door, so half hangs out.
- Close the door.
- Pull the paper gently.
If the paper slides out easily — the gasket isn’t sealing. Try this at 4-5 different spots around the door. If it fails in 2 or more places, you need a new gasket.
Other signs your gasket needs replacing:
- The rubber feels hard, brittle, or cracked when you press it.
- You can see visible tears or gaps in the seal.
- Frost builds up inside the fridge near the door.
- The door doesn’t stay closed — it pops open on its own.
- Condensation or water droplets form on the outside of the door.
- Your electricity bill has gone up without any other explanation.
If the gasket looks fine and the paper test passes, the problem might be door alignment or a hinge issue — not the gasket itself.
What Tools Do You Need
You don’t need a toolbox for this job. Here’s the complete list:
- Your hands — most gaskets pull out and push in by hand.
- A flat-head screwdriver — only if the old gasket is stuck or glued in.
- Warm water and mild soap — for cleaning the door channel.
- A clean cloth — to wipe the channel dry.
- A bucket or bathtub — for soaking the new gasket (optional but recommended).
That’s it. No drills, no wrenches, no special equipment.
What Type of Gasket Do You Need
Not all gaskets are the same. You need to match the type and size to your specific fridge model.
Three main types:
1. Push-to-Lock (most common in India)
The gasket has a built-in lip or bracket that snaps into a channel on the door. You push it in and it locks. To remove, you just pull it out.
2. Screw-Fit / Side-Fitting
The gasket is held in place by screws or a metal retainer strip. You need to unscrew the strip, remove the old gasket, and screw the new one in.
3. Magnetic Seal
The gasket has a magnetic strip inside that holds the door shut against the metal fridge frame. Common in older models and commercial refrigerators.
How to identify yours:
Pull the gasket gently at one corner. If it comes out easily with a bracket shape visible — it’s push-to-lock. If you see screws or a metal strip — it’s screw-fit. If the rubber won’t budge at all — it might be glued or embedded (seal type).
Universal vs Model-Specific:
Universal gaskets can be cut to size, but they rarely seal as well as model-specific ones. The magnetic strip has to align perfectly with your door frame, and universal kits make you cut and join corners yourself. Always try to get the exact gasket for your fridge model if possible.
Before You Install: Prepare the New Gasket
This step matters more than people think. New gaskets arrive folded and compressed from shipping. If you install them cold and stiff, they won’t sit flat and you’ll get gaps.
Method 1: Sunlight
If you don’t have a bathtub big enough, lay the gasket flat in direct sunlight for 1-1.5 hours. The heat does the same thing — relaxes the rubber and removes fold lines.
Method 2: Hair Dryer (Use with caution)
You can use a hair dryer on low heat to warm specific stubborn spots. But keep it moving constantly — never hold it in one place for more than 3-4 seconds. Overheating can melt the vinyl surface and ruin the gasket.
After warming, let the gasket cool down before installing.
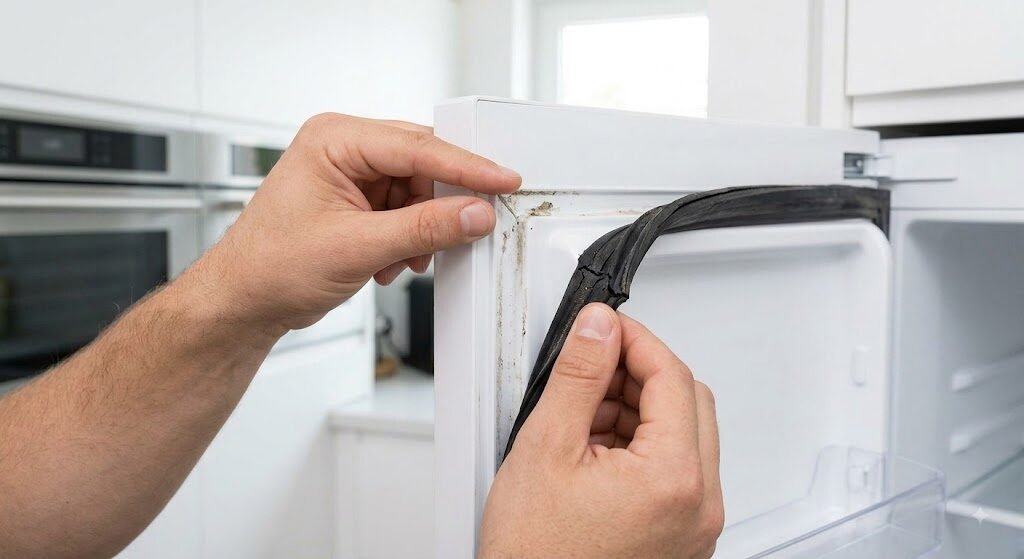
How to Remove the Old Gasket
For push-to-lock gaskets:
- Open the fridge door fully.
- Find a corner of the gasket — any corner works.
- Grab the rubber and pull it straight out of the channel. It comes out easily by hand.
- Work your way around the entire door, pulling the gasket out as you go.
- Set the old gasket aside.
For screw-fit gaskets:
- Locate the screws or retainer strip holding the gasket.
- Use a screwdriver to remove the screws.
- Pull the old gasket out.
- Keep the screws safe — you’ll need them for the new gasket.
For glued or embedded gaskets:
If the gasket won’t pull out, it might be glued. Use a flat-head screwdriver to gently pry it out. Be careful not to damage the door channel.
Clean the channel:
Once the old gasket is out, clean the door channel with warm soapy water. Remove any dirt, food residue, or old adhesive. Dry it completely with a clean cloth. A clean channel means a better seal for the new gasket.
Step-by-Step: How to Install the New Gasket
Here’s the actual installation process. Take your time — rushing causes most fitting problems.
Step 1: Start at the top corners.
Place the new gasket at one top corner of the door. Press the bracket or lip into the channel. You’ll feel it click or snap into place.
Step 2: Work along the top edge.
Push the gasket into the channel along the entire top edge of the door. Press firmly and evenly. Don’t stretch the rubber — let it sit naturally.
Step 3: Move to the sides.
Work down both sides of the door, pressing the gasket into the channel as you go. Start from the top and work toward the bottom on each side.
Step 4: Finish at the bottom.
The bottom edge is usually the trickiest. Press the gasket in firmly along the bottom. If there’s any excess rubber, distribute it evenly — don’t bunch it up in one spot.
Step 5: Check the corners.
Go back to all four corners and make sure the gasket is seated properly. Corners are where gaps most often appear. Press them in firmly.
Step 6: Close the door and inspect.
Close the fridge door. Look at the seal all the way around. Run your hand along the edges — you should feel the gasket pressing against the door frame evenly. No gaps, no loose spots.
The First 3 Days: Why Your New Gasket Won’t Seal Perfectly Right Away
This is the part most guides skip, and it’s the reason most people think they did something wrong.
Here’s the truth: a brand new gasket will NOT seal perfectly on day one. The rubber is stiff from shipping, the magnetic strip inside hasn’t settled against the door frame yet, and the whole gasket needs time to take the shape of your specific door. This is completely normal.
What happens during the first 3 days:
- Day 1: The gasket is stiff and may have small gaps. The magnet is weak and might not hold the door firmly. Don’t worry — this is expected.
- Day 2: The rubber starts relaxing. The magnetic strip begins settling against the metal door frame. Gaps start closing on their own.
- Day 3: The gasket has taken the shape of your door. The magnet is at full strength. The seal should be tight.
The golden rule: Lock the door for 2-3 days after installation.
After you install the gasket, close the fridge door and keep it shut. If the door pops open on its own (because the magnet is still weak), use masking tape or a bungee cord to hold it shut. Leave it locked for 2-3 days. This gives the magnetic strip time to bond with the door frame and the rubber time to settle into its final shape.
Real talk: Most people install the gasket, close the door, see it pop open, and think they messed up. They didn’t. The magnet just needs a few days to wake up. Lock the door, walk away, come back in 3 days. Problem solved.
What NOT to do in the first 3 days:
- Don’t keep opening and closing the door repeatedly to “test” it — this disrupts the settling process.
- Don’t pull on the gasket to “adjust” it — let it settle naturally.
- Don’t use a hair dryer to force it — heat helps with wrinkles, but the magnet needs cold time to set.
- Don’t remove and reinstall the gasket — you’ll reset the whole process.
After 3 days — now do the paper test:
- Remove the tape or bungee cord.
- Place a piece of paper halfway inside the closed door.
- Pull it gently.
- The paper should drag — it shouldn’t slide out easily.
Test at 5-6 spots around the door — top, bottom, both sides, and corners. By day 3, the seal should be tight everywhere. If the paper still slides out at one spot, that area might need a bracket adjustment or the gasket size might be slightly off.
What If It Still Doesn’t Seal After 3 Days?
If you’ve waited 3 days and the seal still isn’t right, here’s what to check:
If the gasket is wavy or has folds:
- Use a hair dryer on low heat to warm the wavy spots. Keep it moving — don’t hold it still.
- Gently push the gasket toward the door frame with your fingers.
- Close the door and leave it shut overnight — the heat + pressure combination usually fixes it.
If the door doesn’t close flush:
- The bracket might need adjustment. On single door fridges, the bottom bracket has screws you can loosen to shift the door position slightly.
- Check if the gasket is sitting too high or too low in the channel — pull it out and reseat it.
If there’s a gap at one corner:
- Press the gasket in firmly at that corner. Sometimes the bracket didn’t fully engage.
- If the gap persists, the gasket size might be slightly off. Contact your supplier with photos.
If the door is too tight or hard to close:
- The gasket might be too thick for the bracket. This can happen with universal gaskets.
- Try adjusting the bracket to create more space, or contact the supplier for the correct size.
Single Door vs Double Door: What’s Different
Single door fridges have one gasket on the one door. The process is straightforward — remove old, clean, install new.
Double door fridges have gaskets on both doors. The process is the same for each door, but there are a few extra things to check:
- Top bracket: Usually hidden under a cover panel. Remove the cover, adjust the bracket if needed.
- Middle bracket: Between the two doors. If there’s a gap, add a washer to push the bracket out slightly.
- Bottom bracket: Same as single door — tilt the fridge to access it.
For double door fridges, check the seal on both doors after installation. Sometimes one door seals perfectly and the other has a small gap — that’s usually a bracket alignment issue, not a gasket problem.
How Long Does a Fridge Gasket Last?
A well-maintained gasket can last 8-15 years. But most people replace them every 5-7 years because of wear and tear.
Things that shorten gasket life:
- Slamming the door shut
- Cleaning with harsh chemicals (bleach, strong detergents)
- Extreme temperature changes (garage fridges)
- Food residue and sticky spills left on the seal
Frequently Asked Questions
Can I replace a fridge gasket myself?
Yes. The rubber pulls out and pushes in by hand. No special tools needed. The only time you might need a screwdriver is for screw-fit gaskets or bracket adjustments.
How do I know if my gasket needs replacing?
Do the paper test. If the paper slides out easily when placed in the closed door, the gasket isn’t sealing. Also check for cracks, hardening, or visible gaps in the rubber.
What’s the difference between universal and model-specific gaskets?
Universal gaskets can be cut to fit any fridge, but they rarely seal as well as model-specific ones. The magnetic strip needs to align perfectly with your door frame. Always try to get the exact gasket for your model.
Can I use Vaseline or silicone to fix a leaking gasket?
Vaseline can work as a temporary fix for a very minor leak, but it attracts dirt and degrades rubber over time. If the gasket is cracked, flattened, or hardened — just replace it. A new gasket costs much less than the electricity you’ll waste with a bad seal.
How long does delivery take?
Standard delivery across India takes 5-7 days after dispatch. We usually dispatch within 2-3 days of order confirmation.
What if the gasket doesn’t fit?
Contact us with photos of your old gasket (laid flat and close-up of the bracket). We offer replacements or refunds within 7 days of delivery.
Do I need to unplug the fridge?
It’s recommended. When you tilt the fridge to access brackets, it can shift. Unplugging eliminates any electrical risk and prevents the compressor from running while you work.
Final Thoughts
Replacing a refrigerator door gasket is one of those repairs that looks intimidating but is actually simple once you do it. The key steps are: get the right gasket for your model, warm it up before installing, start from the corners, and check the seal with the paper test.
If you’ve followed all these steps and the door still won’t seal properly, the issue might be door alignment or hinge wear — not the gasket itself. In that case, check the bracket screws and adjust the door position.
A good gasket saves you money on electricity, keeps your food fresh longer, and makes your fridge run quieter. It’s one of the cheapest and most effective maintenance jobs you can do.
Ready to replace your fridge gasket? Check out our complete gasket collection with delivery across India.
Need help choosing the right gasket? Message us on WhatsApp — we’ll help you find the exact match for your fridge model.

Copyright © 2026 AP Electro Parts. All rights reserved.